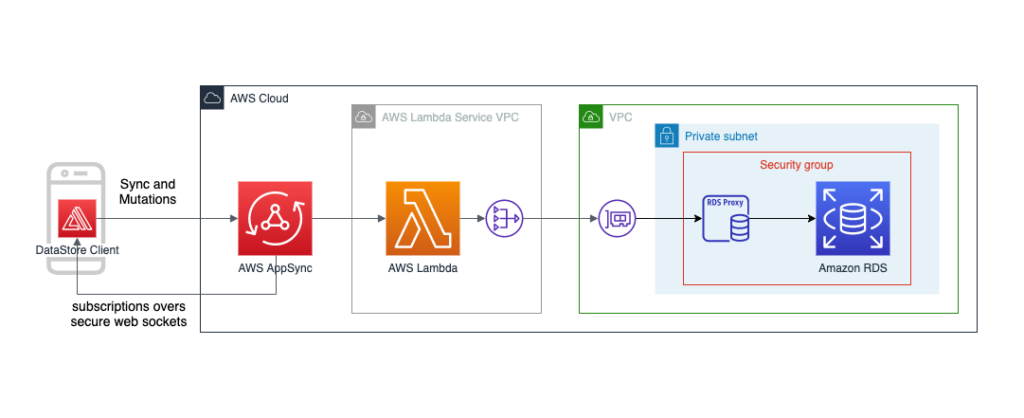
Setting up a SQL database with AWS Amplify is a straightforward process that allows you to quickly and easily create, manage, and scale your database in the cloud. By integrating AWS Amplify with your SQL database, you can leverage the benefits of AWS services such as scalability, reliability, and security. In this guide, we will walk you through the steps to set up a SQL database with AWS Amplify, enabling you to efficiently store and retrieve your data in a cloud-based environment.
Setting up a SQL database with AWS Amplify provides developers with a powerful and flexible solution for building and managing applications. In this guide, you will learn how to create, configure, and connect a SQL database using AWS Amplify, ensuring a robust data management system for your web and mobile applications.
Prerequisites to Set Up a SQL Database with AWS Amplify
Before diving into the setup process, ensure that you have the following:
- An AWS account – If you don’t have one, sign up at AWS.
- The AWS Amplify CLI – Install it globally using npm:
npm install -g @aws-amplify/cliStep 1: Configure AWS Amplify
First, you need to configure the AWS Amplify CLI to interact with your AWS account. Run the following command in your terminal:
amplify configureThis command will guide you through the configuration process. Follow the prompts to create a new IAM user, and take note of your Access Key ID and Secret Access Key.
Step 2: Create a New Amplify Project
Next, create a new directory for your Amplify project and initialize it:
mkdir MyAmplifyProject
cd MyAmplifyProject
amplify init
During the initialization, specify the following:
- Project name
- Environment name
- Default text editor
- Type of app (JavaScript, React, etc.)
- Directory path for your source code
Step 3: Add a SQL Database Using AWS Amplify
To add a SQL database to your Amplify project, utilize the AWS Amplify API category to create a new API. Run the following command:
amplify add apiFor the API type, choose GraphQL. Follow the prompts to set up your GraphQL API, and select Apollo Server as your default resolver.
Step 4: Choosing a Database Type
During the API setup, you will be prompted to choose a database type. You’ll typically have options including:
- AWS RDS (Relational Database Service)
- AWS Aurora
- AWS DynamoDB (though it’s NoSQL)
For setting up a SQL database, we recommend using AWS RDS. Choose RDS and then select the preferred database engine (e.g., MySQL, PostgreSQL).
Step 5: Configuring Database Settings
After selecting your database type, configure the following settings:
- Database instance type
- Allocated storage
- Username and password
- Database name
Once configured, Amplify will manage the creation of your RDS database instance within your AWS account.
Step 6: Setting Up Database Access
To allow your app to access the database, you need to set up the necessary permissions. AWS Amplify automatically creates IAM roles that govern how your API interacts with the database. Ensure that your RDS instance security group allows connections from your Amplify API.
Step 7: Deploying the API and Database
To deploy your API and database, run:
amplify pushThis command provisions the necessary resources in AWS. Monitor the output for any errors and ensure every component is set up correctly.
Step 8: Connecting Your Application to the Database
Now that your database is running, you can connect your application to it. Import the Amplify libraries in your app and configure the API connection:
import Amplify from 'aws-amplify';
import awsconfig from './aws-exports';

Amplify.configure(awsconfig);
Step 9: Querying the SQL Database
To interact with the database, you will use GraphQL queries. Create a GraphQL query in your application to fetch data:
import { API, graphqlOperation } from 'aws-amplify';
import { listItems } from './graphql/queries';

async function fetchItems() {
    const itemData = await API.graphql(graphqlOperation(listItems));
    console.log(itemData);
}
Step 10: Handling Data in Your Application
To handle CRUD (Create, Read, Update, Delete) operations, you’ll also define GraphQL mutations. For example:
import { createItem } from './graphql/mutations';

async function addItem(newItem) {
    await API.graphql(graphqlOperation(createItem, { input: newItem }));
}
This way, you can add new entries to your SQL database through your application.
Step 11: Debugging and Testing Your Setup
After implementing the database interactions, conduct thorough testing:
- Check permissions and access settings
- Monitor API calls for errors
- Verify data integrity and relations
Step 12: Important Considerations
While setting up your SQL database with AWS Amplify:
- Regularly review your database security settings
- Optimize database performance by choosing the right instance size
- Backup your data to prevent loss
By following these steps, you’ve successfully set up a SQL database with AWS Amplify. This powerful combination gives you the ability to manage data seamlessly in your applications. Always keep your applications secure and functional by regularly updating your AWS services and configurations.
Setting up a SQL database with AWS Amplify provides an efficient and scalable solution for managing data in the cloud. By following the steps outlined in this guide, users can easily create a database instance, configure access controls, and seamlessly integrate their applications with the database. Leveraging the power of AWS Amplify makes the process streamlined and enables developers to focus on building innovative solutions without worrying about the underlying infrastructure.


