Building an API Gateway with Traefik is a powerful and efficient way to manage, secure, and control access to your APIs and web services. Traefik, a popular open-source reverse proxy and load balancer, provides a seamless solution for routing, load balancing, and securing API traffic. By setting up Traefik as an API Gateway, you can centralize traffic management, implement authentication and rate limiting, and monitor endpoint health and performance. In this guide, we will walk through the steps to build an API Gateway using Traefik, emphasizing the importance of efficient API management in the context of APIs & Web Services.
Understanding API Gateways
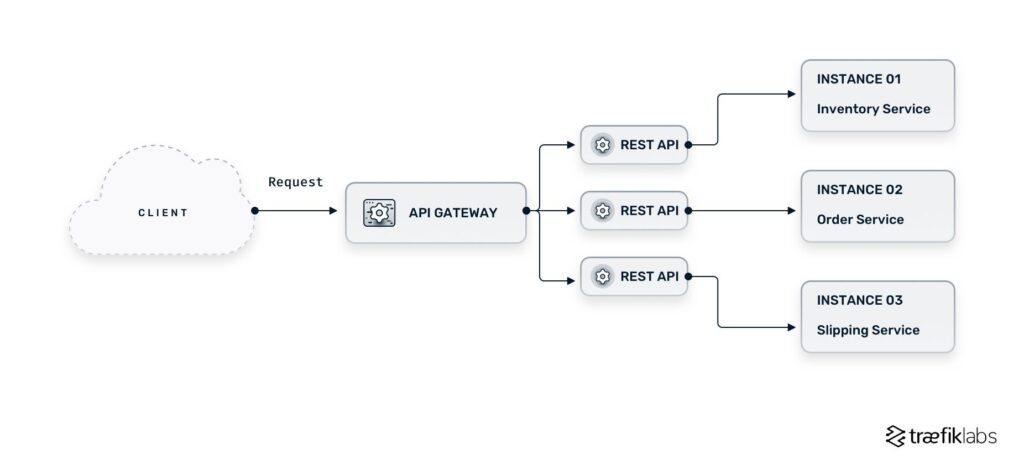
An API Gateway serves as a single point of entry for managing and routing API calls. It acts as a layer between clients and backend services, handling incoming requests, routing them to the appropriate services, and returning the response to the client. This architecture decouples clients from backend services, allowing for better security, scalability, and maintenance.
Enter Traefik, a modern HTTP reverse proxy and load balancer designed for microservices. Traefik seamlessly integrates into DevOps workflows, providing dynamic configuration based on your service needs. Its features make it an ideal choice for building a robust API Gateway.
Prerequisites
Before you start building your API gateway with Traefik, ensure you have the following:
- A server or local development environment with Docker installed.
- Basic understanding of RESTful APIs and microservices architecture.
- Familiarity with command-line interfaces and YAML configuration files.
Installing Traefik
You can easily install Traefik using Docker. Here’s a simple way to get it running:
docker network create web
This command creates a Docker network called “web.” Next, create a directory for Traefik:
mkdir traefik && cd traefik
Now, create a traefik.yml configuration file:
touch traefik.yml
In your traefik.yml file, you can define the following basic configuration:
api:
  dashboard: true

entryPoints:
  web:
    address: ":80"

providers:
  docker:
    endpoint: "unix:///var/run/docker.sock"
    exposedByDefault: false
This configuration does the following:
- Enables the Traefik API Dashboard for monitoring.
- Sets up an entry point on port 80 for HTTP traffic.
- Configures Docker as a provider for dynamic service loading.
Running Traefik as a Docker Container
To run Traefik as a Docker container with your configuration, use the following command:
docker run -d
  --name traefik
  --restart=always
  -v /var/run/docker.sock:/var/run/docker.sock
  -v $(pwd)/traefik.yml:/traefik.yml
  --network web
  traefik:v2.8
  --api.insecure=true
  --providers.docker=true
  --entrypoints.web.address=:80
This command does the following:
- Runs Traefik in detached mode.
- Mounts the Docker socket for service discovery.
- Mounts the Traefik configuration file.
Defining Your First Service
Next, you will define a simple API service. Creating a service involves setting up a Docker container representing your backend API. For demonstration purposes, let’s use a simple Node.js service.
Create a directory for your Node.js application:
mkdir node-api && cd node-api
Initialize a new Node.js project:
npm init -y
Install Express:
npm install express
Create a file named app.js with the following content:
const express = require('express');
const app = express();
const PORT = 3000;

app.get('/api', (req, res) => {
  res.json({ message: 'Hello from API!' });
});

app.listen(PORT, () => {
  console.log(`Server running on port ${PORT}`);
});
Next, create a Dockerfile in the same directory:
FROM node:14
WORKDIR /app
COPY package*.json ./
RUN npm install
COPY . .
EXPOSE 3000
CMD ["node", "app.js"]
Build and run the Docker container:
docker build -t node-api .
docker run -d --name node-api --network web --label "traefik.enable=true" --label "traefik.http.routers.node-api.rule=Path(`/api`)" -p 3000:3000 node-api
The command labels Traefik to expose the service under the path `/api`.
Accessing Your API Through Traefik
Now that everything is set up, you can access your API through the Traefik gateway. Open a web browser and navigate to:
http://localhost/api
You should see the message:
{"message":"Hello from API!"}
Enabling HTTPS with Let’s Encrypt
To secure your API gateway, you can enable HTTPS using Let’s Encrypt. Here’s how:
Modify your traefik.yml file to include the following configuration:
entryPoints:
  web:
    address: ":80"
  websecure:
    address: ":443"

certificatesResolvers:
  myresolver:
    acme:
      email: your_email@example.com
      storage: acme.json
      httpChallenge:
        entryPoint: web

providers:
  docker:
    endpoint: "unix:///var/run/docker.sock"
    exposedByDefault: false
Make sure to create an empty acme.json file and set its permissions:
touch acme.json
chmod 600 acme.json
Next, launch Traefik with the updated configuration:
docker-compose up -d
Ensure your Node.js service is labeled for HTTPS:
--label "traefik.http.routers.node-api.rule=Path(`/api`)"
--label "traefik.http.routers.node-api.tls=true"
Access your service securely via:
https://localhost/api
Monitoring and Logging
Monitoring your API gateway is crucial for maintaining performance and debugging. Traefik provides several logging options. To enable access logs, modify your traefik.yml:
log:
  level: DEBUG
  filePath: "/var/log/traefik.log"
Ensure that the log file is writable by the Traefik container:
docker run -d
  -v /path/to/your/logs:/var/log
  --network web ...
Scaling Your API Gateway
As your service grows, you may need to scale your API gateway. Traefik supports load balancing across multiple services.
For example, you can run multiple instances of your Node.js app. Modify your service definition to include replica settings in a Docker Compose file:
version: '3.8'

services:
  traefik:
    ...
  node-api:
    image: node-api
    deploy:
      replicas: 3
    labels:
      - "traefik.enable=true"
      - "traefik.http.routers.node-api.rule=Path(`/api`)"
      - "traefik.http.services.node-api.loadbalancer.server.port=3000"
This setup will distribute incoming requests evenly across all instances of your Node.js application, ensuring high availability.
Conclusion
Building an API gateway with Traefik not only simplifies the management of microservices but also adds essential features like load balancing, HTTPS support, and monitoring. By following the steps outlined above, you can create a robust API management layer that meets your development needs.
Building an API Gateway with Traefik offers an efficient and flexible solution for managing API traffic and routing in the context of APIs & Web Services. By leveraging Traefik’s features, such as dynamic configuration, load balancing, and security options, developers can create a robust gateway that optimizes performance and enhances scalability. Overall, Traefik serves as a powerful tool for simplifying the implementation and maintenance of API gateways, making it a valuable asset for any organization looking to streamline their API management processes.
Related posts:
 What Are APIs and How Do They Work?
 How to Secure Your API with JWT
 Building a Microservices Architecture with APIs
What Are API Keys and How to Use Them Securely?
Building a Microservices Architecture with APIs
What Are API Keys and How to Use Them Securely?
 A Beginner’s Guide to API Monetization
 Using Google Maps API for Location-Based Applications
 How to Handle API Authentication in Mobile Apps
The Importance of API Caching and How to Implement It
How to Handle API Authentication in Mobile Apps
The Importance of API Caching and How to Implement It
 Building a Weather App Using OpenWeather API
 How to Use AI-Powered APIs for Your Applications
 API Gateway vs Load Balancer: Understanding the Differences
How to Set Up API Rate Limiting in Nginx
API Gateway vs Load Balancer: Understanding the Differences
How to Set Up API Rate Limiting in Nginx
 How to Optimize API Response Time for Better Performance
Best API Security Practices to Prevent Attacks
How to Optimize API Response Time for Better Performance
Best API Security Practices to Prevent Attacks