PyCaret is a powerful Python library that revolutionizes the way Big Data professionals can implement Automated Machine Learning (AutoML) in their applications. With its easy-to-use interface and comprehensive functionality, PyCaret simplifies the process of building, training, and deploying machine learning models, making it an invaluable tool for handling vast amounts of data efficiently. In this article, we will explore how PyCaret can be leveraged in Big Data applications to streamline the machine learning workflow and achieve more accurate and efficient results.
What is PyCaret?
PyCaret is an open-source, low-code machine learning library in Python that simplifies the process of model training. It is designed for both beginners and experienced data scientists, providing an interactive environment for machine learning workflows. PyCaret automates tasks such as data preprocessing, feature selection, model selection, and hyperparameter tuning, making it a suitable tool for AutoML in Big Data applications.
Benefits of Using PyCaret for Big Data Applications
Using PyCaret for your Big Data projects comes with several advantages:
- Speed: PyCaret’s simplicity allows for quicker experimentation with machine learning models, which is critical when working with large datasets.
- Automation: With default settings, PyCaret automates several steps, allowing users to focus on interpreting results rather than getting bogged down with code.
- Flexibility: PyCaret supports multiple machine learning algorithms and integrates seamlessly with other libraries like Pandas and Scikit-learn.
- Visualization: It offers built-in visualization tools that help in understanding model performance and data distributions easily.
Prerequisites for Using PyCaret
To effectively utilize PyCaret for your Big Data applications, you should ensure:
- Python 3.6 or higher is installed on your system.
- You have a basic understanding of data science concepts and machine learning principles.
- Jupyter Notebook or any other Python IDE is set up for running your scripts.
- Install PyCaret via pip with the command
pip install pycaret.
Getting Started with PyCaret
To demonstrate the use of PyCaret in a Big Data application, let’s consider a sample dataset. For this example, we will use a synthetic dataset created with Pandas.
Step 1: Import Necessary Libraries
import pandas as pd
from pycaret.classification import *
Load your dataset from CSV or SQL into a Pandas DataFrame. For larger datasets, libraries like Dask or Vaex can be considered to handle data efficiently.
Step 2: Load the Data
data = pd.read_csv('big_data_sample.csv')
For effective handling of Big Data, you may want to sample your data initially. Dask can help with such tasks if you’re working with gigabytes of data.
Step 3: Set Up the PyCaret Environment
Initialize a PyCaret environment by calling the setup() function. This function performs automated data preprocessing:
clf = setup(data=data, target='target_column', session_id=123)
In the above function, target_column should be replaced with the name of your dependent variable. The session_id helps to ensure reproducibility.
Step 4: Compare Models
After setting up the environment, you can compare various machine learning models using the compare_models() function:
best_model = compare_models()
This function evaluates a number of models based on their default hyperparameters and returns the best-performing model.
Step 5: Create a Model
Once you identify the best model from the comparison step, you can create it for more detailed evaluation:
model = create_model('rf') # Use 'rf' for Random Forest
PyCaret supports a variety of model types, including regression, classification, and clustering algorithms. You can explore these by replacing 'rf' with other model identifiers such as 'dt' for Decision Tree or 'knn' for K-Nearest Neighbors.
Step 6: Tune Hyperparameters
To enhance model performance, you can tune hyperparameters using the tune_model() function:
tuned_model = tune_model(model)
This function applies a series of optimizations to determine the best hyperparameter settings for your model.
Step 7: Evaluate the Model
Model evaluation is crucial to understand its performance. Use the evaluate_model() function to visualize its metrics:
evaluate_model(tuned_model)
This will display various plots showing performance metrics like confusion matrix, ROC curve, and feature importance.
Step 8: Prepare Final Model
Once satisfied with the model’s performance, prepare it for deployment:
final_model = finalize_model(tuned_model)
The finalize_model() function locks the model so that it cannot be altered. It is now ready for predictions on unseen data.
Step 9: Make Predictions
To make predictions on new data, simply use the predict_model() function:
predictions = predict_model(final_model, data=new_data) # Replace new_data with your new dataset
Step 10: Save the Model
Finally, save the model for future use:
save_model(final_model, 'final_model_filename')
Scaling PyCaret for Big Data
When applying PyCaret in Big Data applications, consider these best practices:
- Data Sampling: For exceptionally large datasets, consider sampling techniques to perform initial experiments.
- Use Distributed Computing: Integrate with Dask, Apache Spark, or Databricks to scale your computations across multiple cores or clusters.
- Monitor Resource Usage: Track your system’s CPU and memory usage while running PyCaret models, modifying your approach as needed based on performance.
Advanced Features of PyCaret
Beyond the basic functionalities, PyCaret offers advanced features that can significantly enhance your AutoML experience in Big Data applications:
- Custom Pipelines: You can create custom transformation pipelines using sklearn compatible transformers.
- Ensemble Modeling: Use different ensemble techniques such as bagging, boosting, or stacking to improve your model accuracy.
- Model Interpretation: Leverage built-in tools for SHAP values and other interpretability techniques to better understand model predictions.
Integrating PyCaret with Other Tools
You can enhance your Big Data workflows by integrating PyCaret with broader data science ecosystems:
- Dashboards: Combine PyCaret with Plotly or Dash to create interactive dashboards for better visualization of model performance.
- Deployment: Use cloud services like AWS or Azure for scalable deployment of your models.
- Data Validation: Integrate with Great Expectations for data validation before model training.
Conclusion and Next Steps
Now that you have a clear understanding of how to use PyCaret for AutoML in Big Data applications, you can start implementing machine learning projects with ease. The next steps could involve:
- Experimenting with different datasets.
- Integrating PyCaret into your CI/CD pipelines for automated model deployments.
- Learning more about advanced machine learning techniques and how PyCaret can simplify their implementation.
PyCaret provides a powerful and efficient tool for leveraging AutoML in Big Data applications. With its user-friendly interface and extensive library of algorithms, PyCaret simplifies the process of model training, evaluation, and deployment. By automating repetitive tasks and allowing for quick comparison of multiple models, PyCaret enables data scientists to tackle complex Big Data problems more effectively and efficiently.
Related posts:
 What is Big Data? A Beginner’s Guide
 The Five Vs of Big Data: Volume, Velocity, Variety, Veracity, and Value
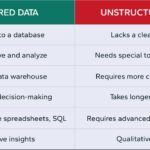 Structured vs. Unstructured Data: Key Differences and Examples
 What is a Data Lake? Definition, Uses, and Benefits
 Introduction to Distributed Computing in Big Data
 Understanding Data Pipelines in Big Data
 Data Ingestion Techniques for Big Data Processing
 What is Apache Hadoop? A Complete Guide
 Understanding Apache Spark: Features and Use Cases
 What is Kafka? How it Powers Real-Time Big Data Applications
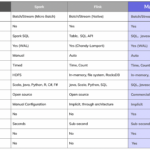 Apache Flink vs. Apache Spark: Which One is Better?
 Introduction to NoSQL Databases for Big Data
 The Role of MongoDB in Big Data Analytics
 Understanding HBase: How it Works in the Hadoop Ecosystem