Building a headless CMS API with Strapi is a powerful way to create flexible and scalable content management solutions. Strapi is an open-source headless CMS that provides a robust API for managing content across various platforms. With a focus on APIs & Web Services, building a headless CMS API with Strapi allows developers to easily customize and extend the functionality of their content management system. By leveraging Strapi’s API capabilities, developers can create dynamic and interactive web experiences, enabling seamless integration with different front-end technologies. This approach enables faster development cycles, improved content delivery, and enhanced user experiences, making Strapi an ideal choice for building modern, API-centric applications.
What is a Headless CMS?
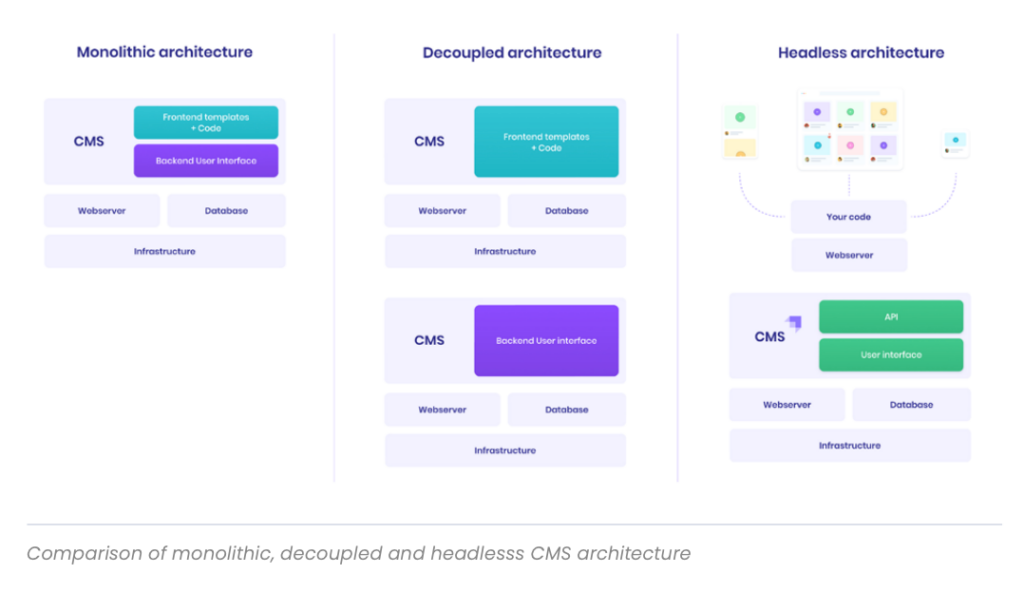
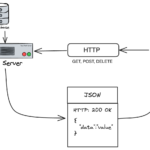
A headless CMS (Content Management System) is a back-end only content management system that provides a way to manage content independently from the front-end presentation. It uses APIs to deliver content to various platforms, such as websites, mobile apps, and even IoT devices. By separating the front-end from the back-end, developers can build a more agile, performant, and scalable digital experience.
Why Choose Strapi?
Strapi is an open-source headless CMS that is highly customizable, user-friendly, and developer-friendly. It is built on Node.js, which makes it fast and efficient. Strapi stands out due to its versatility and robust features:
- Customizable API: Strapi allows you to create RESTful or GraphQL APIs instantly.
- Built-in User Management: You can manage users and roles seamlessly.
- Media Management: Easily upload and manage media assets.
- Self-hosted: You can host Strapi on your own server for complete control.
Setting Up Your Development Environment
Before building your headless CMS with Strapi, ensure you have the following software installed on your machine:
- Node.js: Version 14 or above.
- Yarn: Package manager for JavaScript.
- MongoDB, PostgreSQL, MySQL, or SQLite: Choose at least one database to store your data.
Installing Strapi
To create a new Strapi application, open your terminal and execute the following command:
npx create-strapi-app my-project --quickstartThis command initializes a new Strapi project named my-project with a default SQLite database. Once the installation completes, navigate to your project folder:
cd my-projectConfiguring Your Database
If you prefer using a different database instead of SQLite, Strapi supports various databases. To configure your chosen database, follow these steps:
- Open the config/database.js file in your Strapi project.
- Modify the settings based on your database choice. For example, for PostgreSQL:
{
  "defaultConnection": "default",
  "connections": {
    "default": {
      "connector": "bookshelf",
      "settings": {
        "client": "postgres",
        "host": "127.0.0.1",
        "port": 5432,
        "database": "my_database",
        "username": "my_username",
        "password": "my_password"
      },
      "options": {
        "useNullAsDefault": true
      }
    }
  }
}
Running Strapi
To start your Strapi application, run the following command in your terminal:
npm run developOnce the server is up and running, you can access the Strapi admin panel at http://localhost:1337/admin. Here, you’ll be prompted to create an admin user.
Creating Content Types
After setting up your Strapi project, the next step is to create your content types. Content types define the structure of your application. Let’s create a simple blog post content type:
- Go to the Content-Type Builder in the admin panel.
- Click on Create new collection type.
- Name it Blog Post and add fields like:
- Title (type: String)
- Content (type: Rich Text)
- Published Date (type: Date)
- Author (type: String)
- Save your changes.
Populating Your Content
Now that you have created a content type, it’s time to add some content:
- Visit the Content Manager from the administrator dashboard.
- Select Blog Post and click on Add New Blog Post.
- Fill in the fields you created earlier.
- Click on Save.
Accessing Your API
Strapi automatically generates a powerful RESTful API based on your content types. To fetch your blog posts, you can make a GET request to:
http://localhost:1337/blog-postsYou can use tools like Postman or cURL to test the API. For instance, using cURL:
curl http://localhost:1337/blog-postsThis will return a JSON array containing all the blog posts you’ve created.
Adding API Authentication
To secure your API, implement authentication. Strapi provides built-in authentication features. To set this up:
- In the admin panel, go to Settings > Users & Permissions Plugin.
- Enable Permissions for your desired roles.
- Adjust the permissions for the Blog Post API.
Now, to access protected routes, you will need to authenticate using JWT tokens.
Using GraphQL with Strapi
If you’re a fan of GraphQL, Strapi has built-in support for it. To enable GraphQL:
- Visit the Marketplace in the admin panel.
- Find and install the GraphQL plugin.
After installation, you will have access to a GraphQL playground at:
http://localhost:1337/graphqlYou can simply query your content using GraphQL. For example:
query {
  blogPosts {
    id
    title
    publishedDate
    author
  }
}
Deploying Your Strapi Application
Once your Strapi application is ready, consider deploying it. You can host your Strapi application on various cloud providers like Heroku, DigitalOcean, or AWS. A simple deployment process includes:
- Select a cloud provider.
- Set up a PostgreSQL or MongoDB instance.
- Push your Strapi code to the server.
- Ensure your environment variables (like database URLs) are properly configured.
Integrating Front-End Frameworks
Now that you have your API up and running, you can integrate it with various front-end frameworks. Popular frameworks that work well with Strapi include:
- React: Utilize libraries like Axios to fetch data from Strapi.
- Vue.js: Easily consume APIs using Vuex and Axios.
- Next.js: Build server-rendered apps that pull data from your Strapi backend.
Maintaining Your Strapi API
After deployment, consider the following maintenance tips:
- Regular Backups: Ensure your database is regularly backed up.
- Monitoring: Use monitoring tools to keep an eye on performance and errors.
- Update: Regularly update Strapi to the latest version to patch security vulnerabilities.
Conclusion
Building a headless CMS API with Strapi is a powerful way to manage content. With its robust features, easy setup, and flexibility, Strapi offers developers a comprehensive solution for modern web applications.
Building a headless CMS API with Strapi offers a powerful and flexible solution for managing content, facilitating seamless integration, and enhancing the development process within the realm of APIs and web services. By leveraging Strapi’s user-friendly interface and robust features, developers can efficiently create, customize, and expose APIs to support a wide range of applications and devices. This streamlined approach not only enhances the user experience but also improves scalability, adaptability, and overall performance in the rapidly evolving digital landscape.
Related posts:
 How to Use AWS Cognito for API User Authentication
 How to Integrate the Telegram Bot API for Automated Messaging
 How to Implement an API Gateway for Serverless Applications
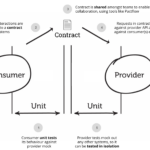 What Is an API Consumer-Driven Contract and How to Use It?
 The Benefits of Using Server-Sent Events (SSE) in APIs
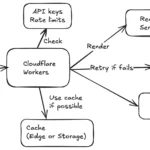 How to Use Cloudflare Workers to Optimize API Performance
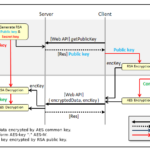 How to Implement API Data Encryption with AES
 How to Implement API WebSockets with NestJS
 The Difference Between API SDKs and API Wrappers
 How to Implement API Response Caching with Varnish
 How to Use the Notion API for Task Management Automation
 How to Implement API Request Prioritization with Queues
 How to Implement API Connection Pooling for Database Efficiency
 How to Implement Dynamic API Routing for Multi-Tenant Applications