
Building an API that supports WebRTC for live video calls involves leveraging the power of real-time communication over the web. WebRTC (Web Real-Time Communication) is a technology that enables browser-based applications to initiate audio and video calls without the need for third-party plugins. By designing and implementing a robust API, developers can facilitate seamless communication between users in a variety of use cases, such as video conferencing, online consultations, and virtual events. In this guide, we will explore the key considerations and best practices for creating an API that harnesses the capabilities of WebRTC to deliver high-quality live video calls through web services.
Understanding WebRTC and Its Importance
WebRTC (Web Real-Time Communication) is a powerful technology that enables peer-to-peer audio, video, and data sharing between browsers and mobile applications without the need for plugins. It facilitates live video calls and interactive real-time streaming functionalities. One of the paramount advantages of WebRTC is that it enhances user experience by providing low latency communication, ensuring high-quality video and audio streaming capabilities.
Choosing the Right Tools and Frameworks
To build an API that supports WebRTC for live video calls, you need to select a reliable technology stack. Here are some of the essential tools and frameworks that play a critical role in the development process:
- Node.js: Perfect for building scalable network applications due to its non-blocking I/O model.
- Express.js: A web application framework for Node.js that simplifies the development of APIs.
- Socket.io: A JavaScript library that enables real-time communication between clients and servers.
- Redis: An in-memory data structure store used as a database and message broker for managing session data.
- WebRTC API: Provides the necessary protocols and JavaScript APIs to facilitate communication.
Setting Up Your Development Environment
Before you start building your API, make sure your development environment is properly set up. This includes:
- Install Node.js: Download and install Node.js from nodejs.org. This will install both Node and npm (Node Package Manager).
-
Create a New Project: Use the command line to create a new folder and initialize your project with
npm init -y. -
Install Required Packages: Run the command
npm install express socket.io corsto install the necessary libraries.
Building Your WebRTC API
Now, let’s walk through the process of building a basic API that supports WebRTC for live video calls. We will create a simple server to handle signaling, which is crucial for establishing a WebRTC connection.
1. Setting Up the Express Server
Create a new file named server.js and set up an Express server as follows:
const express = require('express');
const http = require('http');
const socketIo = require('socket.io');
const cors = require('cors');

const app = express();
app.use(cors());

const server = http.createServer(app);
const io = socketIo(server);
const PORT = process.env.PORT || 4000;

server.listen(PORT, () => {
    console.log(`Server is running on port ${PORT}`);
});
2. Implementing WebRTC Signaling
WebRTC requires signaling to exchange connection information. Use Socket.io to facilitate this:
io.on('connection', (socket) => {
    console.log('New user connected');

    socket.on('join', (room) => {
        socket.join(room);
        socket.to(room).emit('user-connected', socket.id);
    });

    socket.on('offer', (offer, room) => {
        socket.to(room).emit('offer', offer);
    });

    socket.on('answer', (answer, room) => {
        socket.to(room).emit('answer', answer);
    });

    socket.on('ice-candidate', (candidate, room) => {
        socket.to(room).emit('ice-candidate', candidate);
    });

    socket.on('disconnect', () => {
        console.log('User disconnected');
    });
});
Creating the Client-Side Code
With the server set up, let’s move to the client side. Here is a basic example of how to connect and interact with the WebRTC API using JavaScript:
// Client-side code
const socket = io.connect('http://localhost:4000');
const peers = {};
const localVideo = document.getElementById('localVideo');
const remoteVideo = document.getElementById('remoteVideo');

// Use getUserMedia API for video/audio streaming
navigator.mediaDevices.getUserMedia({ video: true, audio: true })
    .then(stream => {
        localVideo.srcObject = stream;

        socket.emit('join', 'room1'); // Join a room

        socket.on('user-connected', userId => {
            addNewPeer(userId, stream);
        });
    });

function addNewPeer(userId, stream) {
    const peerConnection = new RTCPeerConnection();
    peers[userId] = peerConnection;

    stream.getTracks().forEach(track => {
        peerConnection.addTrack(track, stream);
    });

    peerConnection.onicecandidate = event => {
        if (event.candidate) {
            socket.emit('ice-candidate', event.candidate, 'room1');
        }
    };

    peerConnection.ontrack = (event) => {
        remoteVideo.srcObject = event.streams[0];
    };

    peerConnection.createOffer().then(offer => {
        socket.emit('offer', offer, 'room1');
        return peerConnection.setLocalDescription(offer);
    });
}

socket.on('offer', (offer, userId) => {
    const peerConnection = new RTCPeerConnection();
    peers[userId] = peerConnection;

    peerConnection.setRemoteDescription(new RTCSessionDescription(offer));
    peerConnection.createAnswer().then(answer => {
        peerConnection.setLocalDescription(answer);
        socket.emit('answer', answer, 'room1');
    });
});

socket.on('answer', (answer, userId) => {
    peers[userId].setRemoteDescription(new RTCSessionDescription(answer));
});

socket.on('ice-candidate', (candidate, userId) => {
    peers[userId].addIceCandidate(new RTCIceCandidate(candidate));
});
Testing Your WebRTC API
Once you have set up the server and client, it’s time to test your application. Open multiple browser windows (or tabs) and join the same room to see peer connections in action. Monitor the console for any connection logs or error messages.
Enhancing Your API for Scalability
For real-world applications, a basic setup is often insufficient. Here are methods to scale your WebRTC API:
- Load Balancing: Place your server behind a load balancer to handle increased traffic.
- STUN/TURN Servers: Use STUN and TURN servers to facilitate NAT traversal and improve connectivity.
- Database Integration: Store session data and user information in a database like MongoDB or PostgreSQL.
- Security Protocols: Implement HTTPS and other security measures to protect user data.
Optimizing Your WebRTC API
Ensure the performance and reliability of your API with these optimization techniques:
- Adaptive Bitrate Streaming: Adjust the video quality based on network conditions to maintain a smooth experience.
- Monitoring and Analytics: Implement tools to monitor performance metrics and user engagement.
- Error Handling: Build robust error handling processes to manage connection issues and provide feedback to users.
Conclusion
Building an API that supports WebRTC for live video calls can significantly enhance the user experience in your applications. By following the steps outlined above, you can create a scalable and efficient solution tailored to your needs.
Building an API that supports WebRTC for live video calls requires careful consideration of real-time communication protocols, security measures, and scalable infrastructure. By adhering to industry standards, leveraging libraries and frameworks, and continuously testing and optimizing performance, developers can create a robust and reliable API that enables seamless live video calls for users across various platforms.
Related posts:
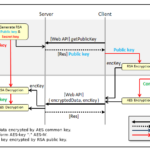 How to Implement API Data Encryption with AES
 How to Integrate the Google Analytics API for Web Traffic Analysis
 How to Implement API WebSockets with NestJS
 The Difference Between API SDKs and API Wrappers
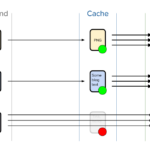 How to Implement API Response Caching with Varnish
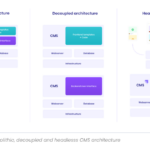 How to Build a Headless CMS API with Strapi
 How to Use the Notion API for Task Management Automation
 How to Use the OpenWeather API for Real-Time Air Quality Monitoring
 How to Implement API Access Management with OAuth Scopes
 How to Use the Notion API to Automate Project Management
 How to Implement API Request Prioritization with Queues
 How to Build an API That Supports Biometric Authentication
 How to Implement API Connection Pooling for Database Efficiency