
Building a secure API Gateway using Envoy Proxy is crucial for ensuring the reliability and security of API services in today’s interconnected world. Envoy Proxy, with its powerful features, offers a robust solution for managing, securing, and monitoring API traffic effectively. In this guide, we will explore best practices for configuring Envoy Proxy to create a secure API Gateway that protects against various threats and enhances the overall performance of your APIs and web services. By following the steps outlined in this guide, you can build a secure and reliable API Gateway that acts as the first line of defense for your APIs, enabling you to deliver secure and efficient services to your users.
What is an API Gateway?
An API Gateway serves as a single entry point for managing and routing API requests. It acts as a mediator between clients and backend services, providing functionalities such as load balancing, caching, security, and analytics. By centralizing the management of APIs, an API Gateway allows organizations to streamline their operations and enhance security.
Why Choose Envoy Proxy?
Envoy Proxy is an open-source edge and service proxy designed to handle high-throughput applications. Here are some key features that make Envoy an excellent choice for building a secure API Gateway:
- High Performance: Envoy is built for speed, capable of handling millions of requests per second.
- Layer 7 Routing: It allows for complex routing configurations based on HTTP headers, URIs, etc.
- Observability: Envoy provides extensive logging, metrics, and tracing to monitor API behavior.
- Security: It supports mTLS, OAuth2, and other security measures to secure data in transit.
Prerequisites
Before building your secure API Gateway with Envoy Proxy, ensure you have the following prerequisites:
- A solid understanding of API structures and protocols (REST, gRPC).
- Basic knowledge of containerization (e.g., Docker).
- A running instance of Kubernetes or a similar orchestration tool (optional, but recommended for scalability).
- Installed Envoy Proxy on your server. Instructions can be found on the official Envoy documentation.
Setting Up Envoy Proxy
To get started with Envoy Proxy, you’ll need to configure the Envoy YAML file, which defines listeners, clusters, routes, and other configurations.
1. Create the Envoy Configuration File
Create a file named envoy.yaml in your working directory. Here’s a sample configuration:
apiVersion: v3
static_resources:
  listeners:
  - name: listener_0
    address:
      socket_address: { address: 0.0.0.0, port_value: 8080 }
    filter_chains:
    - filters:
      - name: envoy.filters.network.http_connection_manager
        config:
          codec_type: AUTO
          stat_prefix: ingress_http
          route_config:
            name: local_route
            virtual_hosts:
            - name: local_service
              domains: ["*"]
              routes:
              - match: { prefix: "/" }
                route: { cluster: service_backend }
          http_filters:
          - name: envoy.filters.http.router
  clusters:
  - name: service_backend
    connect_timeout: 5s
    type: STRICT_DNS
    lb_policy: ROUND_ROBIN
    load_assignment:
      cluster_name: service_backend
      endpoints:
      - lb_endpoints:
        - endpoint:
            address:
              socket_address: { address: my_service, port_value: 80 }
2. Run Envoy Proxy
After creating the configuration file, you can start the Envoy Proxy using the following command:
envoy -c /path/to/your/envoy.yaml
Enhancing Security with Envoy Proxy
To secure your API Gateway, you can implement various features that Envoy provides:
1. Mutual TLS (mTLS)
mTLS ensures that both the client and server authenticate each other. To enable mTLS, update your configuration as follows:
  transport_socket:
    name: envoy.transport_sockets.tls
    typed_config:
      "@type": type.googleapis.com/envoy.extensions.transport_sockets.tls.v3.DownstreamTlsContext
      common_tls_context:
        tls_certificates:
        - certificate_chain:
            filename: "/etc/envoy/certs/server.crt"
          private_key:
            filename: "/etc/envoy/certs/server.key"
2. Rate Limiting
To protect your services from abuse, you can configure rate limiting in Envoy. This prevents excessive API calls from a single client:
http_filters:
- name: envoy.filters.http.rate_limit
  config:
    domain: your_service
    stage: 0
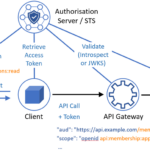
3. Authentication and Authorization
Integrating authentication mechanisms such as OAuth2 can significantly enhance the security of your APIs. You can use Envoy’s built-in filters for this purpose:
http_filters:
- name: envoy.filters.http.oauth2
  config:
    discovery_service: "your_discovery_service_url"
    ...
Cluster Configuration and Load Balancing
Envoy Proxy allows you to define multiple clusters for backend services, which can help in distributing the load effectively. Configuring different load balancing strategies such as ROUND_ROBIN, RANDOM, or LEAST_REQUEST can increase the resilience of your services:
clusters:
- name: service_backend
  lb_policy: ROUND_ROBIN
  ...
Monitoring and Observability
Observability is key to effective troubleshooting and monitoring. Envoy comes with built-in metrics collection that integrates easily with tools such as Prometheus and Grafana:
stats_config:
  use_tcp_for_stats: false
  stats_sinks:
    - name: envoy.statsd
      config:
        address:
          socket_address: { address: statsd_server, port_value: 8125 }
Deploying the API Gateway to Kubernetes
Deploying Envoy Proxy on a Kubernetes cluster improves scalability and manageability. Here’s a simple deployment YAML you can create:
apiVersion: apps/v1
kind: Deployment
metadata:
  name: envoy
spec:
  replicas: 3
  selector:
    matchLabels:
      app: envoy
  template:
    metadata:
      labels:
        app: envoy
    spec:
      containers:
      - name: envoy
        image: envoyproxy/envoy:v1.20.0
        ports:
        - containerPort: 8080
        volumeMounts:
        - name: envoy-config
          mountPath: /etc/envoy
      volumes:
      - name: envoy-config
        configMap:
          name: envoy-config
---
apiVersion: v1
kind: Service
metadata:
  name: envoy
spec:
  selector:
    app: envoy
  ports:
    - protocol: TCP
      port: 80
      targetPort: 8080
  type: LoadBalancer
Testing Your API Gateway
To verify that your API Gateway is functioning as expected, you can use tools like Postman or curl to send requests to your endpoint:
curl http://your-envoy-instance:80/api/v1/resource
Monitor the logs and metrics to ensure requests are flowing through Envoy and that security features are functioning properly.
Conclusion
By carefully following the steps outlined above, you can effectively set up a secure API Gateway using Envoy Proxy. Implementing strong security measures, efficient load balancing, and thorough observability will help create a robust and resilient API architecture that meets your organization’s needs.
Building a secure API Gateway with Envoy Proxy is a highly effective approach for enhancing the security and performance of APIs in a distributed system. By leveraging Envoy’s robust features such as rate limiting, authentication, and encryption, developers can create a resilient gateway that protects backend services from potential security threats while optimizing communication between clients and servers. This results in a more reliable and secure API infrastructure that meets the demands of modern web services.
Related posts:
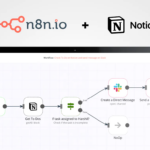 How to Use the Notion API for Task Management Automation
 What Is API Schema Validation and Why Is It Important?
 How to Use the OpenWeather API for Real-Time Air Quality Monitoring
 How to Build an API That Supports WebRTC for Live Video Calls
 How to Use the NASA API for Space Data Integration
 How to Implement API Access Management with OAuth Scopes
 How to Use the Notion API to Automate Project Management
 How to Implement API Request Prioritization with Queues
 The Benefits of Using gRPC for Low-Latency API Communication
 How to Monitor API Performance Using Prometheus and Grafana
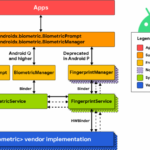 How to Build an API That Supports Biometric Authentication
 How to Implement API Connection Pooling for Database Efficiency
 How to Implement Dynamic API Routing for Multi-Tenant Applications