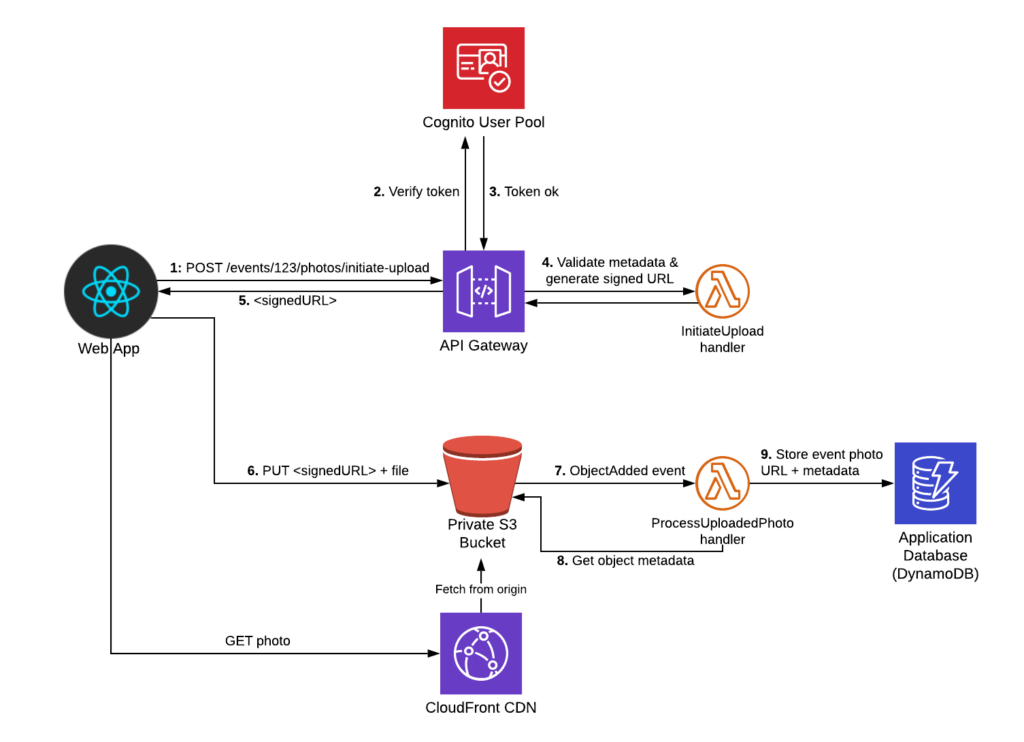
Building an API for image upload and processing is a powerful way to streamline and automate image-related tasks in web applications. By leveraging APIs and web services, developers can create a systematic way for users to upload images to a server, process them according to specific requirements, and retrieve the results efficiently. This approach allows for the seamless integration of image processing functionalities into various applications, offering enhanced user experiences and improved workflow efficiencies. In this guide, we will explore the key considerations and steps involved in designing and implementing an API for image upload and processing, highlighting best practices in APIs and web services development.
Understanding API Development for Image Handling
Building an API for image upload and processing involves several key components. An API, or Application Programming Interface, acts as an intermediary that allows different software applications to communicate. In this context, your API will enable clients to upload images, process them, and return results efficiently.
Choosing the Right Technology Stack
The first step in creating an image upload API is to select the right technology stack. Popular combinations include:
- Node.js with Express for the server-side
- Python with Flask or Django
- Ruby on Rails
- PHP with Laravel
Each stack has its advantages, so your choice should depend on your team’s familiarity and the project’s specific requirements.
Setting Up Your Project
After deciding on the technology stack, the next step is to set up your project. For instance, if you’re using Node.js with Express, you can initialize a new project using:
npm init -y
npm install express multer sharp
Here, Multer is used for handling multipart/form-data, which is essential for file uploads, and Sharp is an image processing library.
Creating the API Endpoint for Image Upload
To handle image uploads, you need to create an endpoint in your server. Below is an example of an Express route that enables users to upload images:
const express = require('express');
const multer = require('multer');
const path = require('path');

const app = express();
const PORT = process.env.PORT || 3000;

// Configure storage engine for multer
const storage = multer.diskStorage({
    destination: './uploads/',
    filename: (req, file, cb) => {
        cb(null, file.fieldname + '-' + Date.now() + path.extname(file.originalname));
    }
});

// Initialize upload
const upload = multer({ storage: storage });

// Define the upload route
app.post('/upload', upload.single('image'), (req, res) => {
    if (!req.file) {
        return res.status(400).send('No file uploaded.');
    }
    res.json({ filePath: req.file.path });
});

app.listen(PORT, () => {
    console.log(`Server is running on port ${PORT}`);
});
In this code snippet, we configure Multer to dictate where to store uploaded files and what format to use for file names.
Implementing Image Processing
Once the image is uploaded, you may want to process it. This can involve resizing, filtering, or altering the image in some way. The following example demonstrates how to use Sharp for resizing an image after it is uploaded:
const sharp = require('sharp');

app.post('/upload', upload.single('image'), (req, res) => {
    if (!req.file) {
        return res.status(400).send('No file uploaded.');
    }

    const outputPath = `./uploads/resized-${req.file.filename}`;

    // Resize the image to 500x500 pixels
    sharp(req.file.path)
        .resize(500, 500)
        .toFile(outputPath, (err) => {
            if (err) {
                return res.status(500).send('Error processing image.');
            }
            res.json({ filePath: outputPath });
        });
});
The above code resizes the uploaded image and saves it as a new file. Always ensure to handle errors gracefully to enhance user experience.
Setting Up Validation and Error Handling
Validation is crucial for any API. You should validate the incoming image files to ensure they meet the necessary criteria. You can do it by adding some validations to your Multer configuration:
const upload = multer({
    storage: storage,
    limits: { fileSize: 5 * 1024 * 1024 }, // Limit file size to 5MB
    fileFilter: (req, file, cb) => {
        const filetypes = /jpeg|jpg|png|gif/;
        const mimetype = filetypes.test(file.mimetype);
        const extname = filetypes.test(path.extname(file.originalname).toLowerCase());
        if (mimetype && extname) {
            return cb(null, true);
        }
        cb('Error: File type not allowed!');
    }
});
This snippet limits file uploads to a maximum of 5MB and restricts the accepted file types to JPEG, PNG, and GIF formats.
Testing Your API
Before you expose your API to the public, thorough testing is essential. Tools like Postman or Insomnia can be incredibly useful for testing your endpoints. Ensure that:
- The image uploads correctly under normal conditions.
- Invalid files are rejected as expected.
- Image processing occurs without errors.
You may also want to write automated tests using frameworks such as Mocha or Jest to ensure ongoing reliability as you make changes in the future.
Deploying Your API
Once you have thoroughly tested your API, it’s time to deploy it. Popular cloud services for deployment include:
- Heroku
- AWS (Amazon Web Services)
- DigitalOcean
- Google Cloud Platform
Choose a platform that best fits your needs, and follow their specific instructions for deploying Node.js or other server applications.
Integrating Client Applications
After successfully deploying your API, you can integrate it with client applications. Whether they are mobile apps, web services, or desktop applications, ensure that you properly document your API. Providing clear documentation will enhance the user experience and promote your API’s usage.
Securing Your Image Upload API
Security should never be overlooked. To protect your API from unauthorized access, consider the following strategies:
- Implement API keys or OAuth tokens to restrict usage.
- Use HTTPS to encrypt data in transit.
- Validate and sanitize image content to prevent attacks like code injection.
Regular security audits can help keep your API safe from new vulnerabilities that may arise over time.
Monitoring and Maintenance
Once your API is live, continuous monitoring is crucial. Use monitoring tools like New Relic or Prometheus to track performance metrics and error rates. This will allow you to quickly identify issues and optimize performance.
Regularly update your libraries and frameworks to ensure that your API remains secure and up-to-date with the latest features.
Conclusion
With the steps outlined above, you should now have a solid foundation for creating an API that allows for efficient image upload and processing. The key components include choosing the right technology stack, building the upload and processing endpoints, handling errors, validating input, and ensuring security. With ongoing monitoring and maintenance, your API can provide a valuable resource for developers looking to integrate image functionalities into their applications.
Building an API for image upload and processing involves designing endpoints for accepting image files, implementing image processing functionalities, and establishing secure authentication mechanisms. By following best practices in API development, such as using RESTful principles and incorporating error handling, developers can create a robust and efficient API for image manipulation that can be easily integrated into various applications.
Related posts:
 What Are APIs and How Do They Work?
 How to Secure Your API with JWT
 Building a Microservices Architecture with APIs
What Are API Keys and How to Use Them Securely?
Building a Microservices Architecture with APIs
What Are API Keys and How to Use Them Securely?
 A Beginner’s Guide to API Monetization
 Using Google Maps API for Location-Based Applications
 How to Handle API Authentication in Mobile Apps
The Importance of API Caching and How to Implement It
How to Handle API Authentication in Mobile Apps
The Importance of API Caching and How to Implement It
 Building a Weather App Using OpenWeather API
 How to Use AI-Powered APIs for Your Applications
 API Gateway vs Load Balancer: Understanding the Differences
How to Set Up API Rate Limiting in Nginx
API Gateway vs Load Balancer: Understanding the Differences
How to Set Up API Rate Limiting in Nginx
 How to Optimize API Response Time for Better Performance
Best API Security Practices to Prevent Attacks
How to Optimize API Response Time for Better Performance
Best API Security Practices to Prevent Attacks