When it comes to optimizing database efficiency for APIs and web services, implementing API connection pooling is a crucial strategy. API connection pooling allows multiple API connections to be maintained and reused, reducing the overhead of creating and tearing down connections for each API request. By pooling connections, resources are effectively utilized, improving performance and scalability. In this guide, we will delve into the importance of API connection pooling, how it works, and how to effectively implement it to enhance the performance of your API-driven applications.
In the world of APIs and web services, ensuring efficient database interactions is crucial for the performance and scalability of applications. One effective strategy to enhance these interactions is through API connection pooling. This technique mitigates performance bottlenecks and optimizes resource usage by maintaining a pool of database connections that can be reused, rather than opening new connections for every request. In this article, we explore the concept of connection pooling, its benefits, and how to implement it effectively in your API services.
What is Connection Pooling?
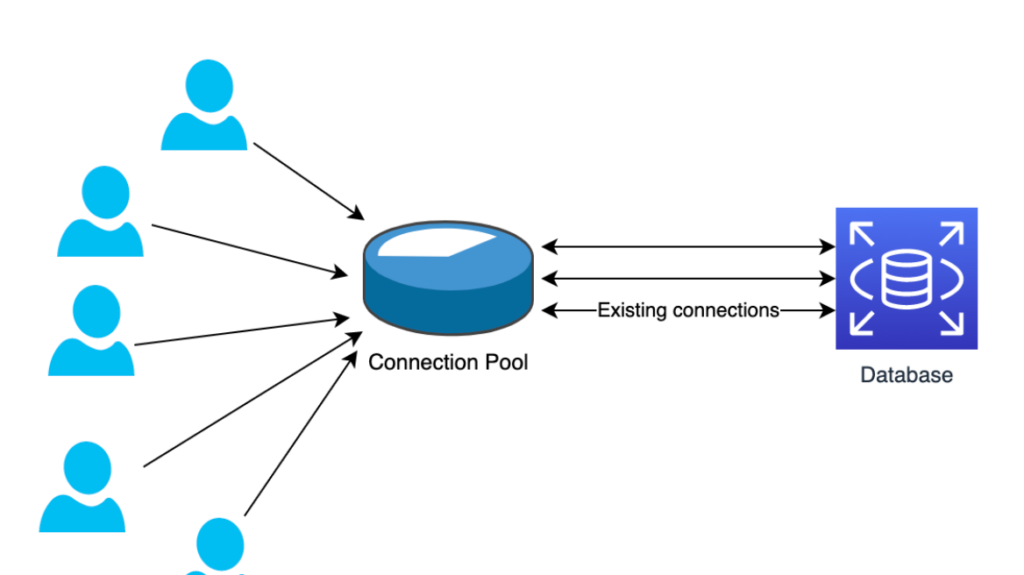
Connection pooling is a method used to manage multiple connections to a database efficiently. Instead of each API request creating a separate connection to the database (which is both resource-intensive and time-consuming), connection pooling allows an application to reuse existing connections from a pool. When a request needs to access the database, it can check out a connection from the pool, use it, and then return it to the pool for future use.
Benefits of API Connection Pooling
Implementing connection pooling offers several significant advantages:
- Improved Performance: The overhead of establishing a new database connection can be substantial. Connection pooling significantly reduces this overhead by reusing connections.
- Lower Resource Consumption: By limiting the number of active database connections, connection pooling helps manage server resources more efficiently.
- Scalability: Applications can handle more simultaneous requests without needing to expand the underlying database infrastructure.
- Enhanced Stability: Connection pooling can help maintain consistent performance levels, reducing the risk of server overload during peak usage.
How Connection Pooling Works
The mechanism of connection pooling is straightforward:
- The application initializes a specified number of connections to the database when it starts.
- These connections are maintained in a pool.
- When the application needs to execute a database operation, it checks out a connection from the pool.
- After the operation is completed, the connection is returned to the pool rather than being closed.
- If all connections in the pool are checked out, the application can either wait for an available connection or optionally create a new one, depending on the pooling strategy.
Implementing API Connection Pooling
Implementing connection pooling for a database in your API involves several steps. Let’s break it down:
Step 1: Choose Connection Pooling Library
Depending on your programming language and framework, various connection pooling libraries are available. Some popular choices include:
- Java: HikariCP, Apache DBCP
- Node.js: node-postgres with pooling capabilities, mysql2
- PHP: PDO with persistent connections
- .NET: Entity Framework’s connection pooling
Step 2: Configure the Connection Pool
Tuning your connection pool settings is essential to optimize performance based on your application’s needs. Important settings include:
- Maximum Pool Size: The maximum number of connections that can be created in the pool. This should reflect your API’s load and your database server’s capacity.
- Minimum Pool Size: Keeps a minimum number of connections open to serve prefixed requests without delay.
- Connection Timeout: The duration the pool should wait for a connection before throwing an error.
- Idle Timeout: The duration a connection can remain idle before being removed from the pool. This helps manage database resources effectively.
- Connection Validation: Procedures for testing connections before handing them out from the pool to ensure their validity.
Step 3: Integrate Connection Pooling in Your Application
Once you have chosen a connection pooling library and configured it, you need to integrate it into your API logic. For example, in a Node.js application using mysql2, the integration may look like this:
const mysql = require('mysql2/promise');

// Create a pool
const pool = mysql.createPool({
    host: 'localhost',
    user: 'root',
    password: 'password',
    database: 'mydatabase',
    waitForConnections: true,
    connectionLimit: 10,
    queueLimit: 0
});

// Using a connection from the pool
async function queryDatabase(queryString) {
    const connection = await pool.getConnection();
    try {
        const [results] = await connection.query(queryString);
        return results;
    } finally {
        connection.release(); // Always release the connection back to the pool
    }
}
In this example, connections are managed automatically, and users must ensure that connections are released back to the pool promptly after executing queries.
Step 4: Monitor and Optimize
To ensure effective connection pooling, monitoring the pool’s performance metrics is essential. Various metrics can be examined:
- Active Connections: To gauge application load and identify potential bottlenecks.
- Waiting Time: The average time requests spend waiting for an available connection.
- Error Rates: Tracking any connection errors will help diagnose issues with the database or pooling configuration.
By analyzing these metrics, you can further optimize settings like pool size and connection timeouts for peak performance.
Best Practices for Connection Pooling
Implementing effective connection pooling requires adhering to certain best practices:
- Always Release Connections: Ensure that connections are returned to the pool after use to avoid exhausting the pool’s resources.
- Use Prepared Statements: Implementing prepared statements can further enhance performance and security for frequently executed queries.
- Regularly Review Pool Configuration: Regularly revisiting your pool settings will help align them with the evolving demands of your application.
- Implement Error Handling: Always include error handling in your connection logic to gracefully manage potential database access issues.
- Keep Pool Size Conservative: Having too many open connections can lead to resource contention on your database server; adjust settings according to the specific workload.
Conclusion
Implementing API connection pooling is essential for optimizing database access and enhancing the overall performance of your APIs and web services. By understanding the mechanics of connection pooling, effectively configuring your chosen library, and adhering to best practices, you can ensure that your application remains efficient, scalable, and responsive. Adopting this technique not only improves the application’s performance but also leads to better resource management, facilitating smooth user experiences, especially during peak usage times.
Implementing API connection pooling for database efficiency is a crucial strategy in optimizing performance and resource utilization in the API and web services ecosystem. By efficiently managing database connections through pooling, organizations can enhance scalability, improve response times, and reduce the overall strain on database resources, ultimately leading to a more robust and reliable API infrastructure.
Related posts:
 How to Use AWS Cognito for API User Authentication
 How to Integrate the Telegram Bot API for Automated Messaging
 How to Implement an API Gateway for Serverless Applications
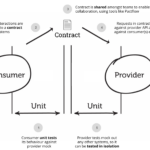 What Is an API Consumer-Driven Contract and How to Use It?
 The Benefits of Using Server-Sent Events (SSE) in APIs
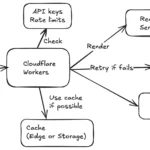 How to Use Cloudflare Workers to Optimize API Performance
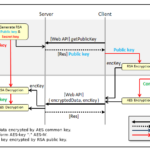 How to Implement API Data Encryption with AES
 How to Implement API WebSockets with NestJS
 The Difference Between API SDKs and API Wrappers
 How to Implement API Response Caching with Varnish
 How to Use the Notion API for Task Management Automation
 How to Implement API Request Prioritization with Queues
 How to Implement Dynamic API Routing for Multi-Tenant Applications