Implementing API WebSockets with NestJS allows you to create real-time, bidirectional communication between clients and servers. By leveraging the power of WebSockets, you can easily push updates and notifications to connected clients without the need for continuous polling. NestJS, a progressive Node.js framework, offers a seamless way to integrate WebSockets into your API services. In this guide, we will explore how to effectively implement API WebSockets with NestJS to enhance the real-time capabilities of your applications, making them more efficient and interactive for users.
Understanding WebSockets
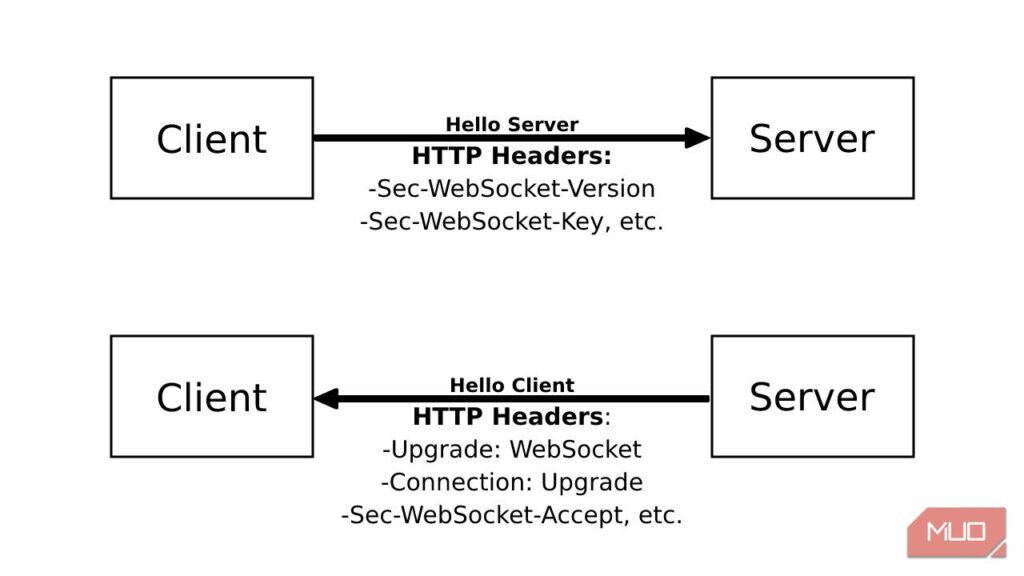
WebSockets provide a way to open a persistent connection between the client and server, enabling real-time data exchange. Unlike traditional HTTP communication, where the connection is closed after each request, WebSockets allow for continuous data flow, making them ideal for applications requiring instant updates, such as chat applications, gaming, or financial services.
Setting Up NestJS
NestJS is a progressive Node.js framework that makes building efficient and scalable server-side applications easier. To get started with NestJS, you need to have Node.js and npm installed on your machine. Follow these steps to create a new NestJS project:
npm i -g @nestjs/cli
nest new websocket-example
After the setup, navigate to the project directory:
cd websocket-example
Installing Required Packages
To implement WebSockets in your NestJS application, you need to install the socket.io package along with its types:
npm install @nestjs/websockets socket.io
npm install --save-dev @types/socket.io
Creating a WebSocket Gateway
In NestJS, a Gateway is a class annotated with the @WebSocketGateway() decorator, allowing it to handle WebSocket connections. Let’s create a new gateway in the src directory:
nest generate gateway chat
This will generate a chat.gateway.ts file. Open and edit it as follows:
import { SubscribeMessage, WebSocketGateway, WebSocketServer } from '@nestjs/websockets';
import { Server } from 'socket.io';

@WebSocketGateway()
export class ChatGateway {
    @WebSocketServer()
    server: Server;

    @SubscribeMessage('message')
    handleMessage(client: any, payload: { sender: string; message: string }): void {
        this.server.emit('message', payload);
    }
}
In this code:
- The subscribeMessage decorator is used to listen for events coming from the client. Here, we listen for a ‘message’ event.
- Within the
handleMessagemethod, we emit received messages back to all connected clients.
Integrating It into the Module
Next, ensure that your gateway is included in the module to be recognized by the NestJS application. Open the app.module.ts file and import the newly created gateway:
import { Module } from '@nestjs/common';
import { ChatGateway } from './chat/chat.gateway';

@Module({
    providers: [ChatGateway],
})
export class AppModule {}
Creating a Client-Side Application
To test our WebSocket implementation, we need a client-side application. You can use plain HTML with JavaScript or any front-end framework like React or Vue. Below is an example of a basic HTML implementation:
<!DOCTYPE html>
<html lang="en">
<head>
    <meta charset="UTF-8">
    <meta name="viewport" content="width=device-width, initial-scale=1.0">
    <title>WebSocket Chat</title>
    <script src="https://cdn.socket.io/4.0.0/socket.io.min.js"></script>
</head>
<body>
    <input id="messageInput" placeholder="Type a message">
    <button id="sendButton">Send</button>
    <ul id="messages"></ul>

    <script>
        const socket = io('http://localhost:3000');

        const messageInput = document.getElementById('messageInput');
        const sendButton = document.getElementById('sendButton');
        const messagesList = document.getElementById('messages');

        sendButton.addEventListener('click', () => {
            const message = messageInput.value;
            socket.emit('message', { sender: 'User', message });
            messageInput.value = '';
        });

        socket.on('message', (data) => {
            const li = document.createElement('li');
            li.textContent = `${data.sender}: ${data.message}`;
            messagesList.appendChild(li);
        });
    </script>
</body>
</html>
This client-side code:
- Connects to the WebSocket server running on localhost:3000.
- Emits a message event when the user clicks the “Send” button.
- Listens for incoming messages and displays them in a list.
Running the Application
To run the NestJS application, navigate back to your project directory and execute the following command:
npm run start
Once the server is running, open your HTML file in a browser. You can open multiple tabs to simulate multiple users. Test sending messages, and you should see real-time updates reflecting across all clients!
Error Handling in WebSockets
While building WebSocket applications, handling errors gracefully is crucial for a smooth user experience. You can handle connection errors using the onConnect and onDisconnect methods:
@SubscribeMessage('connect')
handleConnection(client: Socket) {
    console.log('Client connected: ', client.id);
}

@SubscribeMessage('disconnect')
handleDisconnect(client: Socket) {
    console.log('Client disconnected: ', client.id);
}
This allows you to track the connection status of each client and respond accordingly, whether it’s saving user session data or notifying other users of a user leaving the chat.
Security Considerations
Security is vital when working with WebSockets. Here are a few practices to consider:
- Implement authentication and authorization for your WebSocket connection.
- Validate incoming data from clients to prevent injection attacks.
- Use SSL/TLS encryption for secure data transmission.
Scaling WebSocket Applications
To handle a larger number of WebSocket connections, consider using a message broker like Redis or RabbitMQ. NestJS supports these integrations, allowing you to manage WebSocket connections across multiple instances effectively. For Redis, you can use the @nestjs/platform-express package:
npm install @nestjs/platform-express redis
After integrating a broker, it’s essential to configure your application to handle broadcasting messages efficiently, ensuring all clients receive real-time data without performance degradation.
Conclusion
Implementing API WebSockets with NestJS not only enhances real-time communication but also elevates user experience in applications. By following the guidelines above, you can create a robust WebSocket-based communication system tailored to your application’s needs.
Implementing API WebSockets with NestJS offers a powerful and efficient way to incorporate real-time communication capabilities into API services. By leveraging NestJS’s built-in support for WebSockets, developers can seamlessly enhance the functionality and responsiveness of their APIs, providing users with dynamic, interactive experiences. This approach not only simplifies the development process but also enables the creation of robust, scalable, and versatile APIs that meet the demands of modern web services.
Related posts:
 How to Build a Payment Gateway API with Stripe and Node.js
How to Implement API Rate Limits for Subscription-Based Pricing
How to Build a Payment Gateway API with Stripe and Node.js
How to Implement API Rate Limits for Subscription-Based Pricing
 How to Build an API with Hapi.js in Node.js
 How to Use AI-Based API Analytics for Performance Monitoring
 How to Optimize API Response Times with Lazy Loading
 How to Use AWS Cognito for API User Authentication
 How to Integrate the Telegram Bot API for Automated Messaging
 How to Implement an API Gateway for Serverless Applications
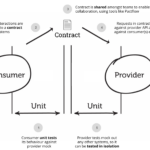 What Is an API Consumer-Driven Contract and How to Use It?
 The Benefits of Using Server-Sent Events (SSE) in APIs
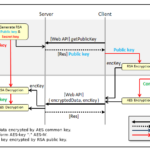 How to Implement API Data Encryption with AES
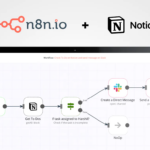 How to Use the Notion API for Task Management Automation
 How to Implement API Request Prioritization with Queues